Showing posts with label scrap. Show all posts

Wednesday, 1 October 2014

Modern Irish {Scrappy} Bee: October Blocks

Hi I'm Tomomi, hive mama for October! This is my very first to do the quilting bee actually so I am very very looking forward to what I am going to get from you ladies!  After nine month going through everybody else blocks, I was bit worried somebody may come up with the same idea as mine. But you didn't! So here you go!

I would like to have bookshelf blocks please :)

My idea came when I saw this beautiful room.  We moved the house last November and got rid of a lot of books but still we have a lot. Yes we are a family of book worms. And now I want to have a book shelf quilt too.  There are some variation of them if you google it, but since this quilting bee is working with scraps, I want to make something like this or this or this.

I like being organised and my book shelf to be organized by genre. To do so, I would ask you to have a theme for each blocks you make. Grown up section, old books, pop section, Jane Austen  section, future section, exotic, or whatever your books collections are. Just no kids section please. Pretty section, maybe.
Only fabric I wouldn't want for the books are whites or very pale unless some bright pattern on it. I am going to ask you to use Kona Ash for the background, so if you can use anything brighter or darker than it, it's fine.


Blocks size : 12.5” H and about 12.5” W. I need you to make them 12.5” high but the width can be between 11” and 13”. I will explain why later. And two blocks please.

How to make blocks.
The short tutorial
Cut up the scraps of fabric for book parts between 2.5” - 1” wide and 6.5” - 11.5” long. Add the necessary length of the Kona Ash as a background fabric on top of each strips to make them 12.5” long altogether.
Fold the seam allowance to the book side together so the book gets some lift from the background.
Stitch all the strips together to make a block about 12.5” wide. You don't need to make them exact 12.5” wide, shorter or longer, both fine.

Please vary the hight of books especially neighbouring ones, means don't put similar hight books next to each other. And wide colour variation please.

The step by step tutorial.
Cut up the scraps of fabric for book parts between 2.5” - 1” wide and 6.5” - 11.5” long. Lay them in order you like with 0.5” overlapping.


Measure and make the total width around 12.5”. I made mines a bit longer to be on the safe side because I usually end up too short.


 Cut one Kona Ash 2.5” wide strip for the background. Measure the length of book strip which is 2.5”, say that was A”. Cut the Kona Ash strip to (13 -  A)” long and stitch it on top of the book strip. That should make the strip 12.5”. Do the same to all the 2.5” books.


Slice the left over 2.5” Kona Ash strip or cut new one to the same width as the next widest book strip. Repeat as above. And proceed to the narrower books. In this way,I Think you don't end up with too much Kona Ash scraps.

Fold the seam allowance to the book side together so the book gets some lift from the background.
When all the books has background attached on the top, stitch them together.  Please verify the hight of books especially neighbouring ones, means don't put similar hight books next to each other. And wide colour variation please.

Alternately, you can make them with this measurement.
Book strips; 2.5” *10.5”, 2.5”*6.5”, 2”*10”, 2*10.5”, 2”*11.5”, 2”*7.5”, 1.5*8.5”, 1.5*7.5”
Background Kona Ash ;  2.5” *2.5”, 2.5”*6.5”, 2”*3”, 2*2.5”, 2”*1.5”, 2”*5.5”, 1.5*4.5”, 1.5*5.5”


I wrote them in order to go together, so don't mix them up! Refert to the pic too. When all the books has background attached on the top, stitch them together whatever the order you like.

The picture is sideways for me to draw easily.  All the measurements are seam allowance included.
  
Please contact me if you find something wrong or difficult in this tutorial. I will help!

Romance Section

Pop Culture Section


Saturday, 1 March 2014

Modern Irish (Scrappy) Bee: March Blocks

I can't believe it's March already! The months seem to be flying by and it's fabulous to be properly into Spring now.


It's Sarah here, queen bee for March and I have a great, fun block for us to make this month which I hope that you will enjoy making. It's hard to follow Cindy's great spool blocks but I'll try!

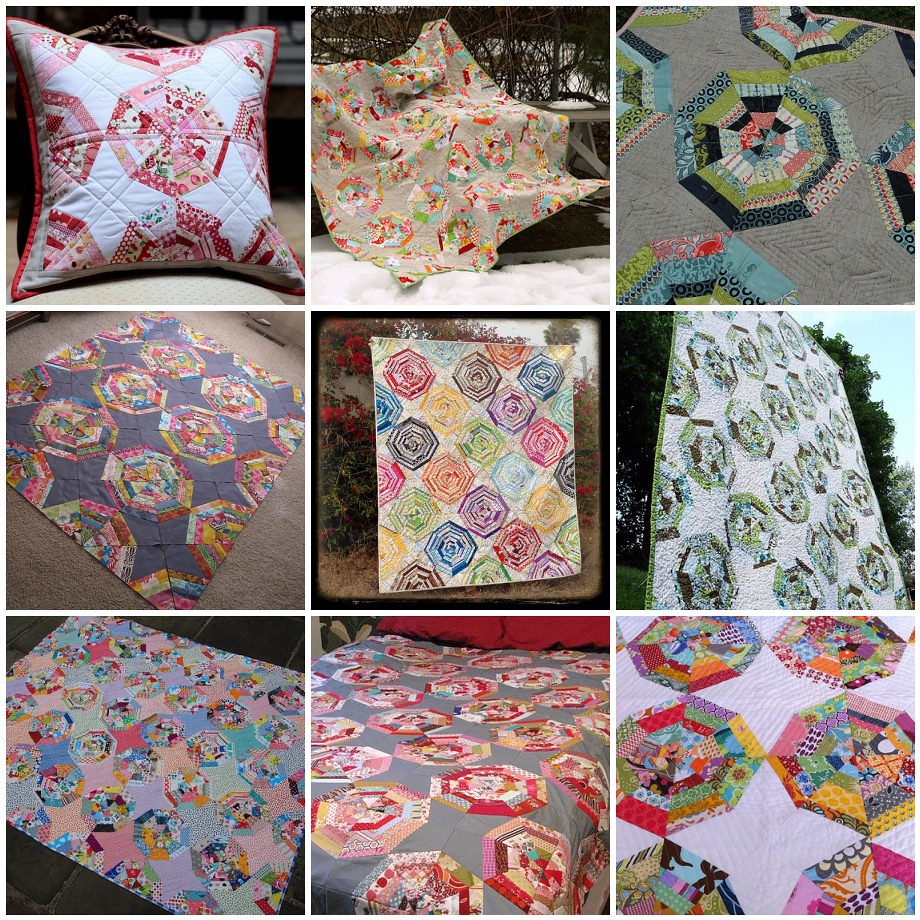
For the longest time, I've been looking at Spiderweb quilts in total envy....I love how they look. Here's my inspiration mosaic:

Spiderweb inspiration

There are quite a few varying spiderweb block tutorials out there but I like this one by Heather best and that's the one we are going to use. Instead of paper, it uses fabric squares as the base which I think makes it much easier to work with.

The look I am going for is bright, vibrant scrappy string webs against a low volume background. You will need 2 x 12.5" fabric squares for background and a variety of strips of fabrics in widths from 1.25" - 2.5" for the spiderweb parts.


For the fabric background squares, I would like you to use a grey based low volume print if you have them. If you're not too familiar with low volume, its basically quiet, muted tones, like in the picture above rather than bold, saturated colours and prints. Hopefully you will have something similar in your scrap baskets, enough for the 2 x 12.5" square. Texty prints with small black writing are fine too like the bottom print above, but nothing where the lettering stands out very dark against the background please. If you don't have any grey low volume, please use Kona Ash which will tone in nicely. These will form the central stars in the blocks.


For the spiderweb strips, I chopped up a heap of scraps in advance, and then as I went along I added a few extra bits depending on my colour combos. For the strips, please use bright fabrics in strong, saturated colours, with a variety of tones and values of colours featuring if you can manage it. No batiks please! A few pale/pastel shades are fine mixed in but please don't have too many. Likewise, a few dark prints mixed in will give great depth, but not too much brown or dark grey or navy etc or it will overwhelm it. Please use a variety of widths in each star point, and the thickest should be 2.5" cut (2" finished).

Once you've prepped your fabric, you'll be ready to start. The first step is to cut your blocks into 4 triangular quarters and mark them for sewing. Heather's instructions are great and really easy to follow so I hope you won't have any problem. But a word of caution - you really need to look at the pictures carefully before marking your fabrics because the markings do NOT join the dots as you might assume (i.e. as I did. Doh). So make sure to pay attention! I used a water soluble marker to mark mine, a pencil would work just as well on the grey fabric. This is what your four quarters should look like when you are done marking:


Once you have the marking done, you're ready for the fun bit - picking and sewing your scraps. I would really like if for each of the blocks, you keep the first strip on each side to be in bright, strong print of the same or similar colour families (but not the same print for each one) for each of the triangles in that block. In my sample block I used red/pink fabrics for each of my first strips, as you can see below.


This will have the effect of picking out the secondary pattern of star shapes on the quilt when it's done. You could use a single colour, or a combo like pink/purple, aqua/blue, yellow/orange - whatever takes your fancy really, pick a different colour/combo for each block.  These should be prints that pop against the low volume background :-)

When you start to piece it looks all messy - mine did anyway! Be sure to flip back the low volume bit underneath, as per the tutorial, and chop it off when you are done. This will leave you with some scraps from your low volume squares.


For the first press, be sure to use a dry iron so as not to distort your nice seams. Once I set the seams, I then pressed (not ironed) with lots of steam to make it look all nice and crisp and ready to trim.

Your finished triangles should look like this:


Once you have your 4 triangles done, play around with the layout till you are happy, then sew together.

When you are sewing up your block, please make sure to match and pin the seams where the strips start on each block so the star shape matches up nicely.


I found it easiest to press my strip seams to one side - mostly in the direction of the star point - and then to press my joining seams open, the block laid flatter that way, but I'm not terribly bothered so do what works for you :-)


I pinned the last seam heavily to keep all the points matched up and hey presto, it was done! The tutorial says to trim to 12" square, but mine came out slightly short of that measurement for some reason, so please don't bother trimming, I will do that myself. I really love this block and I hope you have fun making it.


Any questions, let me know!

Monday, 2 April 2012

Scrap Swap Anyone?


We all love a good scrap swap, don't we?  It's a great way to mix up your stash at a very low cost to all participants.  Want to get involved?

The idea is this: Each person will take a fat quarter-worth of their scraps and put them into the post to me (Cindy) along with a self addressed, stamped return envelope.  I will mix them all up and re-distribute them to each participant so you get a fresh fat quarter-worth of scraps back in the post.  Don't worry, you will not get your scraps back...I'll keep track of who sent in what.  To play along, just leave a comment below so I know to expect your fabric in the post.

The rules:

  • Only modern, quilt shop quality fabric is to be entered.  100% cotton only, please.  
  • Fabric should have bright, lively, colorful prints or bold solids.
  • Scraps should be larger than 2 1/2 by 2 1/2 inches square.
  • Scraps must be received by Cindy no later than 30 April 2012.
  • To save on shipping, this swap is only open to those living on the island of Ireland.
  • Include a stamped, self addressed return envelope for those living in ROI.
  • Folks in NI, email me and we can work out return shipping via paypal or swap a FQ or something...
  • Open to MQG Ireland members only.  If you'd like to join, please head here and complete a registration form.
  • If you want to send in two FQ-worth of scraps and receive two in the post, feel free.
Now let's get swapping!