Wednesday 26 March 2014

Medallion QAL Border Three

Oh, how time flies!  Three weeks have passed since our last QAL post.  In theory, we should have added on our third border set, bringing our quilt top to 48 inches square.  This border, if you're following Track 1 of the Catbird Quilts tutorials, should be a 2 inch thick border followed by a 6 inch thick border.


Now, I have to confess...I am not yet done my 6 inch outer border.  Although indeed I did make progress over the last three weeks, I am now officially behind in my own QAL.  I am really looking forward to seeing where each of you are.  Are you behind as well?  Come on - make me feel better :)

As usual, below you'll find our linky party to show us your progress since early March.  Please do add your link and hop around a bit to see what others are creating.  I am inspired each time I visit your pages, so do visit one another lending a bit of advice or encouragement.

Our next goal, according to Catbird Quilts, is to add another border set (be it single or several borders), adding another 6 inches onto each side of our quilt.  Our tops will then grow from 48 inches to 60 inches square.  Why don't you guys tell me when you want to have the next linky.  Is four weeks enough time to finish off the third border and add on yet another final border?  Will we meet up here on 22 April?

Happy stitching, ladies!


Friday 21 March 2014

Volunteers Needed!

Although Sarah and I have been trying our best to maintain our happy guild of Irish quilters, we have reached the point that we could use help from our members.  We are asking each of you to become more involved by volunteering to participate in maintaining our online presence.
The blog is currently used regularly to give our bee members the details on that month's blocks, the next step of our QAL or to give updates on what's happening in Bee Blessed, but there's so much more to write about!  We  need three volunteers to work together for the next year to keep the content fresh and new.  Update us on what exhibits are coming to Ireland (or what you've seen lately), request guest posts from our own group of quilters, get a few tutorials posted, etc.  Between the three of you posting, say, once a month and the three posts a month created by Cindy, we could have a very vibrant forum.
We have a lovely little facebook page that could use a little more attention, love, creativity, energy.  We are asking for one volunteer to maintain the page, add fun new content and just spice it up a bit.  We do ask that you take the position for 1 year, then we will find another volunteer to take your place.

To volunteer, please leave your name below in a comment.  Specifically tell us if you want to contribute to the blog or the facebook page.  Either Sarah or Cindy will be in touch with you to organize from there.

Thursday 13 March 2014

Bee Blessed: March

This upcoming weekend is the perfect time for sewing!  If you are looking for a block to stitch that's cute, a bit improv AND gives back to the community, Bee Blessed is for you!

Please head on over to Judith's and Sarah's posts to read more, but they are looking for Pippi blocks this month to alternate with the little heart blocks created in February.

Stolen from Judith's blog...

Stolen from Sarah's blog...

Isn't she cute?  Even cuter with those little hearts.  You can find the Pippi block tutorial here.

They're a great laugh to piece - below is my last attempt at a Pippi block.  I do not know why her legs are so thick and how they are both attached to the right of her body, but she was such fun to piece from my scrap bin.  Give one a go!


Wednesday 5 March 2014

Medallion QAL Second Border Linky

How is your medallion quilt coming along? I've seen several beautiful center blocks floating around blog-land. We have a wide variety ranging from a New York Beauty or a Dresden Plate to Retro Flowers or a Bento Box.  One of our members is is even using hexies to create a story in her center block!  How cool!  I really enjoy seeing each quilter's personality starting to appear given their design choices and color pallets.


Now that we are off to a kicking start, do you have a plan for each of your borders?  Over the past two weeks we have added the second border.  I am sure you are now noticing your quilt top rapidly growing and eating up your scrap bin!  We would all love to see what borders you decided to add on, so please do leave your link below.  Are you a flying geese girl or HST lover?

Our next challenge is the third border as described by Catbird Quits.  For Track 1 folks, this is a 2 inch border followed by a 6 inch border bringing your quilt top to 48 inches.  Melanie takes time in this post to describe how you might use these borders to deal with "size issues", so if you're in trouble it's worth a read.  Now that these borders are getting quite large (and eating lots of time and fabric) why don't we take 3 weeks to stitch these borders?  Meet you all back here on 26 March for our next linky.


Saturday 1 March 2014

Modern Irish (Scrappy) Bee: March Blocks

I can't believe it's March already! The months seem to be flying by and it's fabulous to be properly into Spring now.


It's Sarah here, queen bee for March and I have a great, fun block for us to make this month which I hope that you will enjoy making. It's hard to follow Cindy's great spool blocks but I'll try!

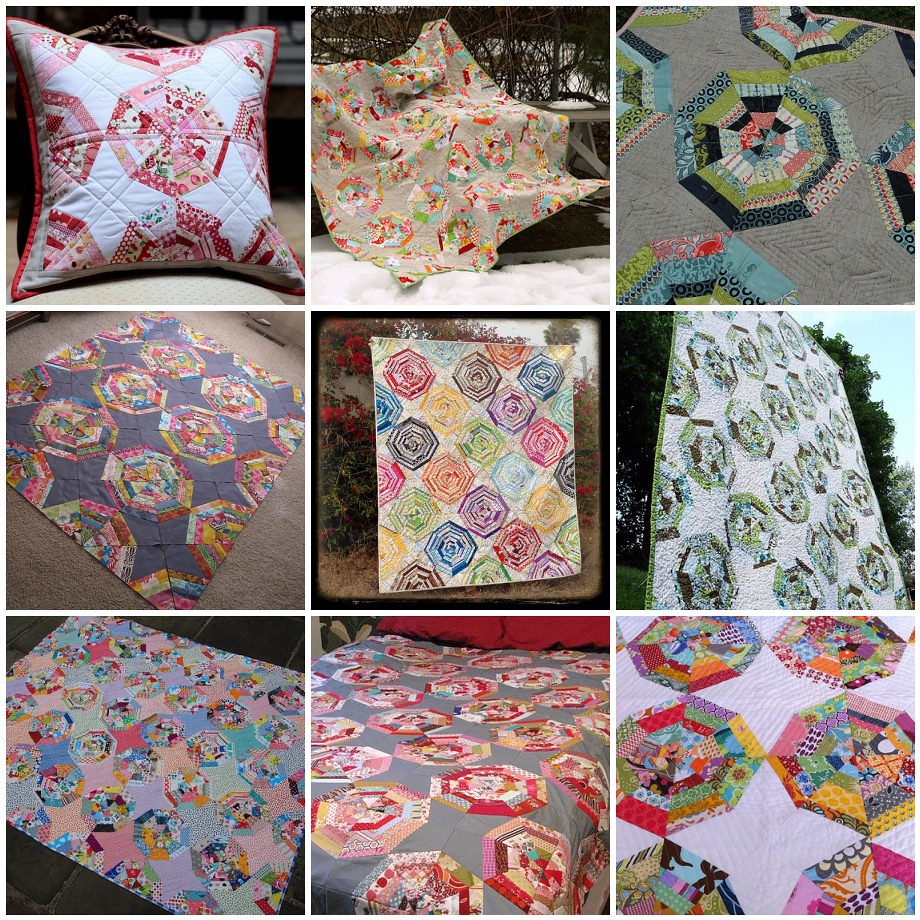
For the longest time, I've been looking at Spiderweb quilts in total envy....I love how they look. Here's my inspiration mosaic:

Spiderweb inspiration

There are quite a few varying spiderweb block tutorials out there but I like this one by Heather best and that's the one we are going to use. Instead of paper, it uses fabric squares as the base which I think makes it much easier to work with.

The look I am going for is bright, vibrant scrappy string webs against a low volume background. You will need 2 x 12.5" fabric squares for background and a variety of strips of fabrics in widths from 1.25" - 2.5" for the spiderweb parts.


For the fabric background squares, I would like you to use a grey based low volume print if you have them. If you're not too familiar with low volume, its basically quiet, muted tones, like in the picture above rather than bold, saturated colours and prints. Hopefully you will have something similar in your scrap baskets, enough for the 2 x 12.5" square. Texty prints with small black writing are fine too like the bottom print above, but nothing where the lettering stands out very dark against the background please. If you don't have any grey low volume, please use Kona Ash which will tone in nicely. These will form the central stars in the blocks.


For the spiderweb strips, I chopped up a heap of scraps in advance, and then as I went along I added a few extra bits depending on my colour combos. For the strips, please use bright fabrics in strong, saturated colours, with a variety of tones and values of colours featuring if you can manage it. No batiks please! A few pale/pastel shades are fine mixed in but please don't have too many. Likewise, a few dark prints mixed in will give great depth, but not too much brown or dark grey or navy etc or it will overwhelm it. Please use a variety of widths in each star point, and the thickest should be 2.5" cut (2" finished).

Once you've prepped your fabric, you'll be ready to start. The first step is to cut your blocks into 4 triangular quarters and mark them for sewing. Heather's instructions are great and really easy to follow so I hope you won't have any problem. But a word of caution - you really need to look at the pictures carefully before marking your fabrics because the markings do NOT join the dots as you might assume (i.e. as I did. Doh). So make sure to pay attention! I used a water soluble marker to mark mine, a pencil would work just as well on the grey fabric. This is what your four quarters should look like when you are done marking:


Once you have the marking done, you're ready for the fun bit - picking and sewing your scraps. I would really like if for each of the blocks, you keep the first strip on each side to be in bright, strong print of the same or similar colour families (but not the same print for each one) for each of the triangles in that block. In my sample block I used red/pink fabrics for each of my first strips, as you can see below.


This will have the effect of picking out the secondary pattern of star shapes on the quilt when it's done. You could use a single colour, or a combo like pink/purple, aqua/blue, yellow/orange - whatever takes your fancy really, pick a different colour/combo for each block.  These should be prints that pop against the low volume background :-)

When you start to piece it looks all messy - mine did anyway! Be sure to flip back the low volume bit underneath, as per the tutorial, and chop it off when you are done. This will leave you with some scraps from your low volume squares.


For the first press, be sure to use a dry iron so as not to distort your nice seams. Once I set the seams, I then pressed (not ironed) with lots of steam to make it look all nice and crisp and ready to trim.

Your finished triangles should look like this:


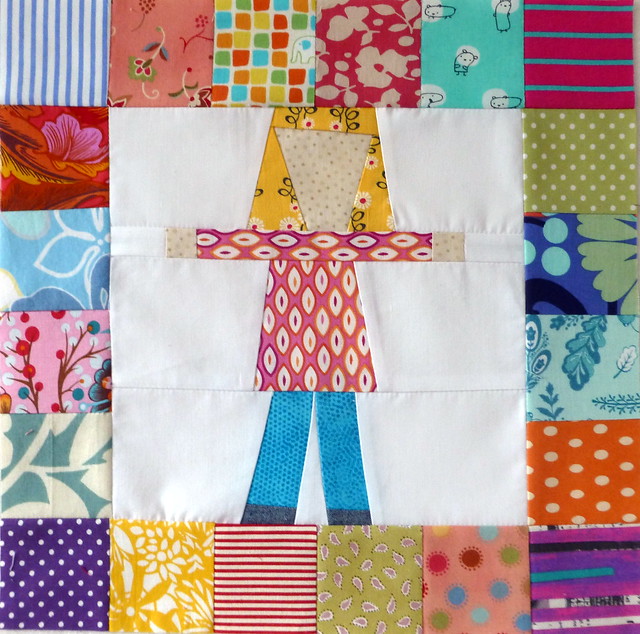
Once you have your 4 triangles done, play around with the layout till you are happy, then sew together.

When you are sewing up your block, please make sure to match and pin the seams where the strips start on each block so the star shape matches up nicely.


I found it easiest to press my strip seams to one side - mostly in the direction of the star point - and then to press my joining seams open, the block laid flatter that way, but I'm not terribly bothered so do what works for you :-)


I pinned the last seam heavily to keep all the points matched up and hey presto, it was done! The tutorial says to trim to 12" square, but mine came out slightly short of that measurement for some reason, so please don't bother trimming, I will do that myself. I really love this block and I hope you have fun making it.


Any questions, let me know!